The problem is that it the camera needs to be directly above the piano and high enough to use a longish focal length (to avoid fisheye distortion of the straight horizontal lines of the piano). You can't just use a normal tripod... it would have to be a really tall tripod with a long boom arm.
But this is exactly the kind of puzzle Johanne and I like to work through over Sunday morning coffee. We put our heads together and came up with a pretty simple solution.
We have ten-foot ceilings, so there's definitely enough room to get the camera high enough. We gave up on the idea of stands and booms right away, which left fixing the camera to the ceiling. Johanne came up with the idea of a T-track like the tracks in power tool tables that let you fix jigs, fences, etc. to the table. The track itself is in the shape of a C, which gives it a T-shaped slot. You slide a T-bolt into the slot, place your object (with a hole in it) over the T-bolt, then tighten it down with a knob.
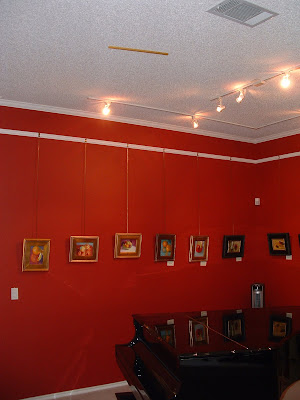
So we installed a short length of T-track on the ceiling above the piano:
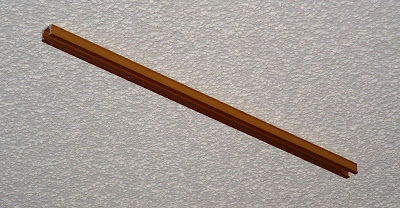
In the zoomed-out photo, the gold T-track above the piano just looks like a gold line on the ceiling. Zooming in, you can make out the C-shape of the track forming a T-slot:
T-track on the ceiling
To fix the camera to the T-track, we bought a simple L-bracket. We fix one arm of the L-bracket to the T-track with a T-bolt and a knob:
The T-shaped head of the T-bolt slides into the slot of the T-track. Tightening the knob fixes the L-bracket to the T-track. Using a single bolt allows us to rotate the bracket under the T-track to get it perfectly square with the piano keyboard. We attach the camera to the other arm of the L-bracket using a 20-1/4" knob bolt, which is one of the standards for camera tripod mounts:
A thin piece of wood keeps the L-bracket from marring the camera and prevents the knob bolt from bottoming out in the camera's tripod mount. The camera can swivel on the L-bracket to make sure the focal plane is parallel with the keytops (to avoid trapezoid distortion).
Simple! I bought the T-track, T-bolt, knob and 20-1/4" knob bolt at Woodcraft, and the L-bracket at Lowe's. Total cost: about $15.


It looks like magic to me.
ReplyDeleteIngenius in its simplicity, you guys. The only permanent thing ends up being a gold track which does not at all mar the looks of the ceiling.
ReplyDeleteIn the 20-1/4" phrase, what does the 20 refer to. Is it just a part number or something?
The 20 is the TPI (threads per inch). The camera tripod mount needs a bolt with a diameter of 1/4" and 20 TPI.
ReplyDeleteWell that is a clever rig! It's simple, secure and ready for use every time you want to film from above. Your explanation, with its step-by-step pictures, provides one of those "aha" moments to a fellow puzzle-solver.
ReplyDelete